Monday, October 18, 2010

A Strad Inspired Violin - Log 10/12/2010

Tuesday, October 12th, 2010
Regraduating the Top Plate

The most significant alteration Ben will make to the violin parts before reassembling them with a new bass bar, neck and fingerboard is the regraduation of the plates.  While this violin does not appear to be modeled after a specific Baroque maker, Ben hopes it will replicate the sounds of the early Amati instruments.  The plates in this instrument do not have quite as high an arching as an Amati or Strad but Ben hopes to remove enough wood in the regraduation process to increase flexibility and still maintain their strength.  His goal on the top plate is to reduce the thickness and weight down to that more common in the Strads and Amatis.  Below is the inside of the top plate before any graduation has started.

Ben is setting up the drill press to act as a depth gauge when he drills pilot holes that will determine the depth to which he removes wood from the plate.  This will go in phases.

Here Ben starts by drilling holes down the center line of the plate.  The gauge on the drill press prevents him drilling the plate deeper than 3.5mm.
Below you can see the pattern of holes covering the plate.  Because parts of the plate were less than 3/5mm thick originally there are no holes or even impressions made by the tip of the drill bit.
The raw wood exposed in the center between the F holes is where Ben has already finger planed down to the bottom depth of the drilled pilot holes.

Here using a caliper thickness gauge you can clearly see he has hit his initial thickness of 3.5mm.

Below the gauge shows some of the original surface was already at 2.7mm.  This is the goal Ben has set for the overall thickness of the top plate.

Here before further drilling and planing Ben is removing hardened glue using a file.

Here he uses a scraper on the glue as he gets closer to the wood surface.

Below a new series of pilot holes have been drilled to a depth of 3mm.

Again, Ben finger planes the plate down this time to the new 3mm thickness.  Before doing this he checked the weight of the plate at the 3.5mm thickness and found it was 77 grams without the bass bar.  His goal is to reduce the weight to below 70 grams including the new bass bar which will probably weigh 5 grams alone.
More planing is shown in two photos below.

After completion of the second graduation pass, Ben reweighs the plate and it has dropped by 4 grams to 73 grams.  This means he may have to further graduate more areas down to as little as 2.7mm or he will not reach his 70 gram overall weight goal.  Throughout this process he tests the plate bending it slightly in his hands to test for the strength and flexibility he wants to achieve.  This is a highly subjective process, his personal judgement of the feel of the wood that has been learned through years of experience testing and hearing the end results after the instrument is completed.
Below Ben is evening out this work using a scraper which will not impact the weight significantly.
Here checking with the calipers again after the second graduation he verifies that he is at 3mm thickness.

A Strad Inspired Violin - Log 9/27/2010

Monday, September 27th, 2010
Making an Impression of the Back and Button Nub

In preparation for replacing the button on the back plate which will attach to the new neck Been needs to make an impression of the remaining button nub and the area surrounding it on the back plate.

On the left below you can see the green dental compound that will be used for the impression.

To protect the plate and make it easier to remove the dental compound Ben usually oils the surface and or place a piece of plastic wrap between the wood and the compound.

The dental compound has to be heated and worked in your hands until it is soft enough to be be pressed over the surface of the wood.  Below the softened compound is shiny as it is pressed against the outside of the back plate with a block of scrap wood.  You can clearly see the button nub against the green compound.


Below the impression is shown after it has hardened and been removed from the violin.

A Strad Inspired Violin - Log 9/16/2010

Thursday, September 16th, 2010

Removal of Remaining Neck and Ribs

Ben saws off as much of the remaining neck as possible.

 The part too close to the back to be safely to sawed must next be removed.


Ben finger planes the rest down to the back plate.
Below after finger planing Ben will need to remove built up glue.

He applies hot water below.  There is a sweet but nauseating odor given off as the glue liquifies.
.
Then he can scrap the softened glue down to the button which will eventually need to be replaced inserting a keystone linked new button just outside of the perfling.
Below Ben is examining the remaining ribs that will need to be removed again using hot water to soften the glue.

Here Ben is working with the C bout corner blocks some of which can be saved while others will need to be replaced.
He needs to separate the C bout blocks and rib lining so that he can remove the bottom bout.
Below is the back plate after the bottom bout ribs have been removed.

Because the bottom bout ribs were formed from a single piece of maple Ben was careful to remove them in one piece. 

Next he needs to clean them up by removing the cracked end block that will need to be replaced.
Below he is using a chisel to cut the block back to the rib.  Interestingly when he examined the bottom bout block and saddle he found additional indicators that this was probably a Mittenwald, German made violin.  The varnish appears to be soft, there is a notch in the rib for centering and inserting the saddle and there was a rosewood or ebony alignment pin that had been nailed through the top plate into the block.

Thursday, September 2, 2010

A Strad Inspired Violin - Log 8/30/2010

Monday August 30th, 2010
Violin Restoration: From Broke to Baroque
The Work Begins

Ben is loosening the bottom bout rib from the back plate in the photo below.  Additional photos show steps in  working on the top plate.


Here Ben is using a chisel to cut away the top of the bass bar.


Once most of the bass bar is removed he switches to a small finger plane which he uses to remove the remainder of the bass bar and the glue which has held it to the top plate.  He uses this technique since the top plate is very thick and he plans to regraduate/thin it anyway.  In the case that the plate was not to be thinned he would use hot water to loosen and remove the last layer and glue.


Below Ben is checking the cracks on the top plate including the one on the lower bass bout which was repaired with cleats(lighter colored wood above his thumb) years before.  The small cleats used previously were not effective and the crack had reopened and will need to be repaired again.


Applying hot water Ben is cleaning the cracks.  


He has removed parts of the old cleats and glue as well as dirt from the cracks that were never repaired.  Below you can clearly see the separation needed so he can apply glue.


For final cleaning he will use water and soap which will cause the foaming seen below.


Before starting to glue the cracks he always does a test clamping to see how the parts will fit together and usually lets the cracks dry out while clamped..


Below he is applying glue to the top bout crack that had never been repaired.   He uses the old "brush and Finger" technique.  First applying the hide glue to the top of the crack with a brush as seen here.


Then he uses his finger to push the glue into the crack and clean the excess off.


On the under side of the plate he will remove excess glue that was forced through the crack from above.


Below the glued cracks are clamped for drying.  After all of the top plate cracks are glued solidly Ben can start the process of thinning/regraduating the thickness of the plate.  That will be at a later date.  When that process is complete however he plan to inlay and glue oval patch (like a sound post patch) much larger and more durable than the cleats used previously.


Sunday, August 29, 2010

A Strad Inspired Violin - Log 8/23/2010

Monday August 23rd, 2010
Violin Restoration: From Broke to Baroque

Some months ago I came across a very old broken fiddle that I was told would be cost prohibitive to repair and was not playable.  In fact, I was told if it had any value at all, it was as wall art.  The wood was very old and attractive as was the original carving of the top and bottom plates which when originally created were probably done by a luthier of some skill.  The instrument had a label that identified it as having been made by an Italian maker from Verona. The maker, Giacomo Zanoli, was not in Verona until after 1740. However, the label itself was nothing like labels of that maker and was probably a fake given that the date was too early for Verona and the spelling of the maker's name was usually Zanioli on original labels. The instrument itself I was told, did not have characteristics of construction or appearance of the Italian school but rather more likely Mittenwald, Germany as witnessed by the lack of mitering at the C-bout corners and shape, chamfering and position of the F holes as well as the position of the mensur marks.

The top bass side rib was a replacement not even constructed of maple nor properly bent to match the curve of the top plate.  The top plate was one piece construction with a number of previously repaired and unrepaired cracks that would have to be repaired or re-repaired to make the instrument playable.  


The bottom plate was from a single piece of maple with quite lovely flaming and unique in appearance.  However, someone had at one time attempted to clean the instrument and had literally scraped away most of the original varnish leaving dark streaks as are visible in the photo below.


The maple ribs which were probably originally carved from similar or the same maple as the back were attractive but had become warped and did not all flow with the curves of the two plates bouts. The lower rib bouts were constructed from a single piece if maple.

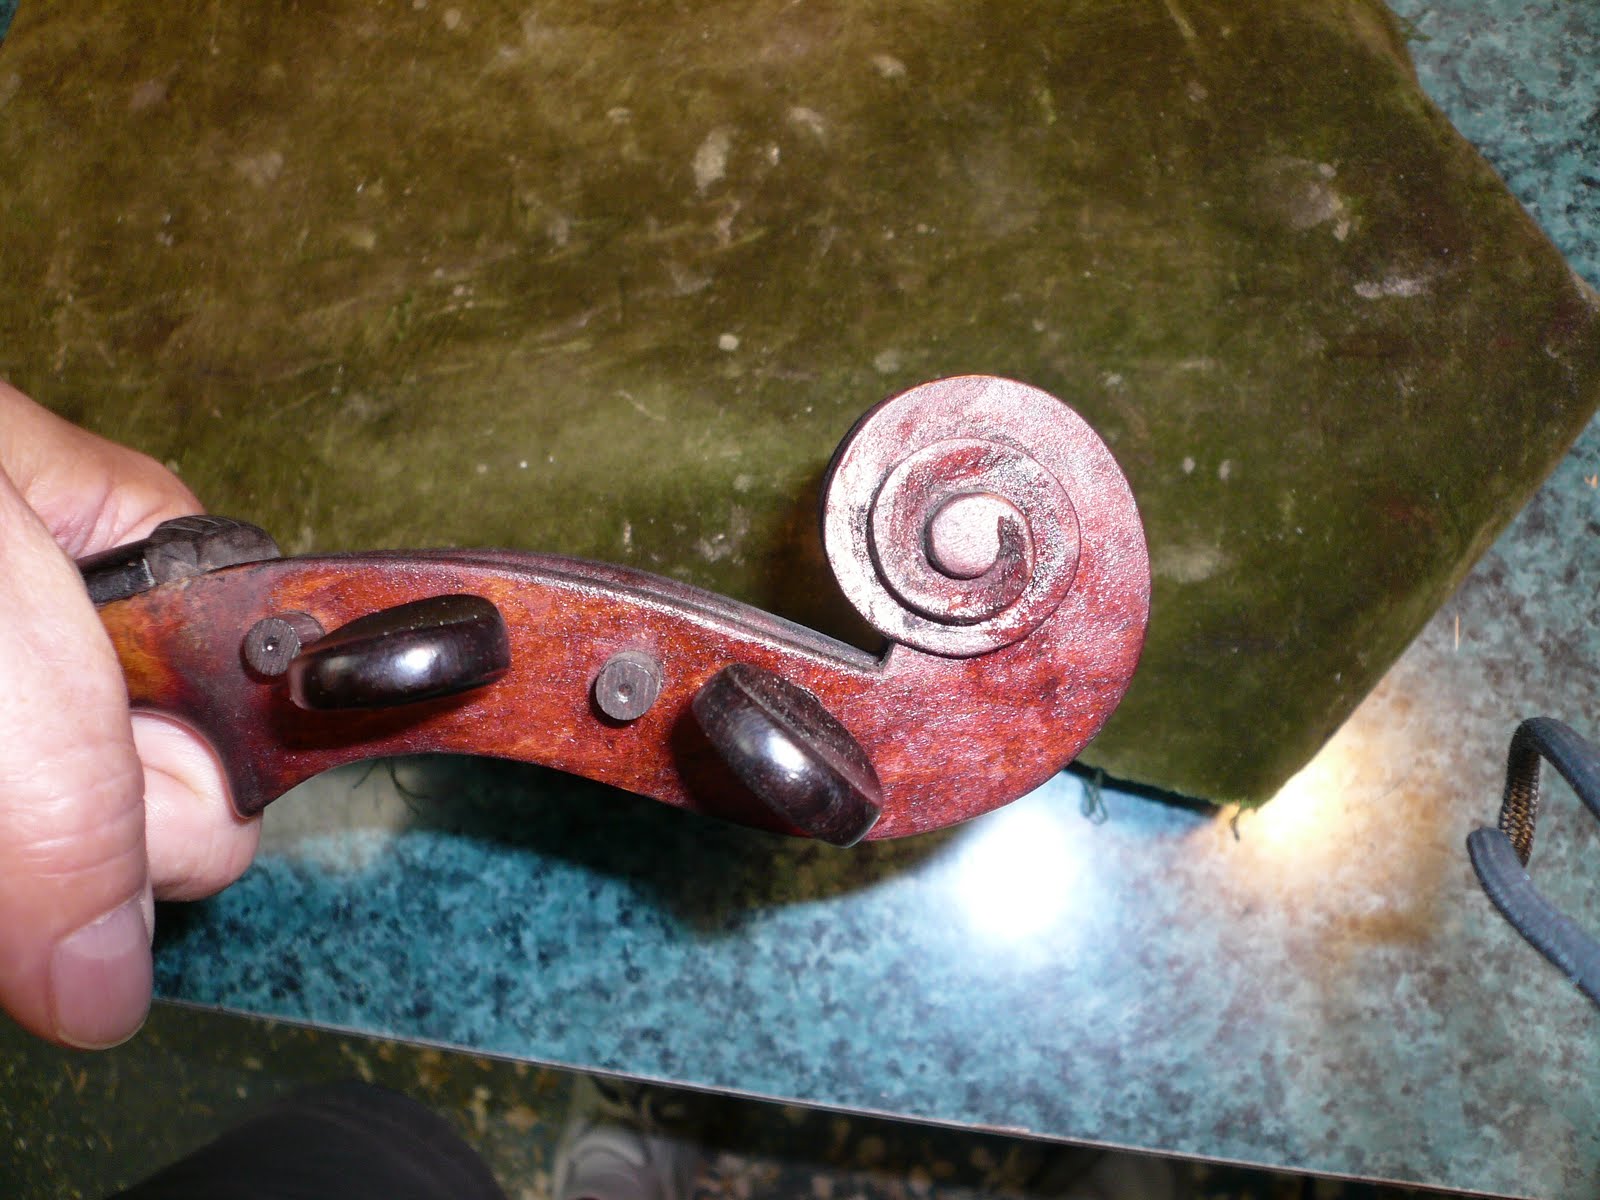
The neck, fingerboard and scroll appeared to be replacements constructed by a country fiddle maker. The scroll photo below shows the fairly crude carving consistent with American folk fiddle construction. 

After leaving the fiddle in my closet for a few months I spoke to Ben Parrott one morning and he asked about the fiddle.  In spite of great expense that would be entailed in doing a restoration it seemed a shame to just hang it on the wall and let even more structural damage occur to it over the years.  Ben suggested that if I was willing to invest the funds he would be willing to remove the top plate to better assess what if any parts of the violin might be salvaged.  Given that Ben believed the age of the top and bottom plates to be 200 years old or more, it had occurred to us that the two plates might be used in construction of a violin setup as they were in the Baroque period.  I thought it would be great fun to play my favorite music and composers on an instrument that could produce the sound as it was when the music was first composed and performed.

To do the assessment Ben first removed the chin rest and pried/popped off the fingerboard from the neck.  The glue was very dry and brittle so it came off very easily.  


Ben found an opening between th etop plate and ribs and inserted a dull blade to begin wedging the plate apart moving carefully around the entire body.


At points where the glue appeared to be resistent or carpenter's glue had been used he applied a few drops of alcohol which when dry cool the glue and make it more brittle and easily broken.


Eventually he worked he way around the fiddle and lifted the plate starting at the bottom by the end button.

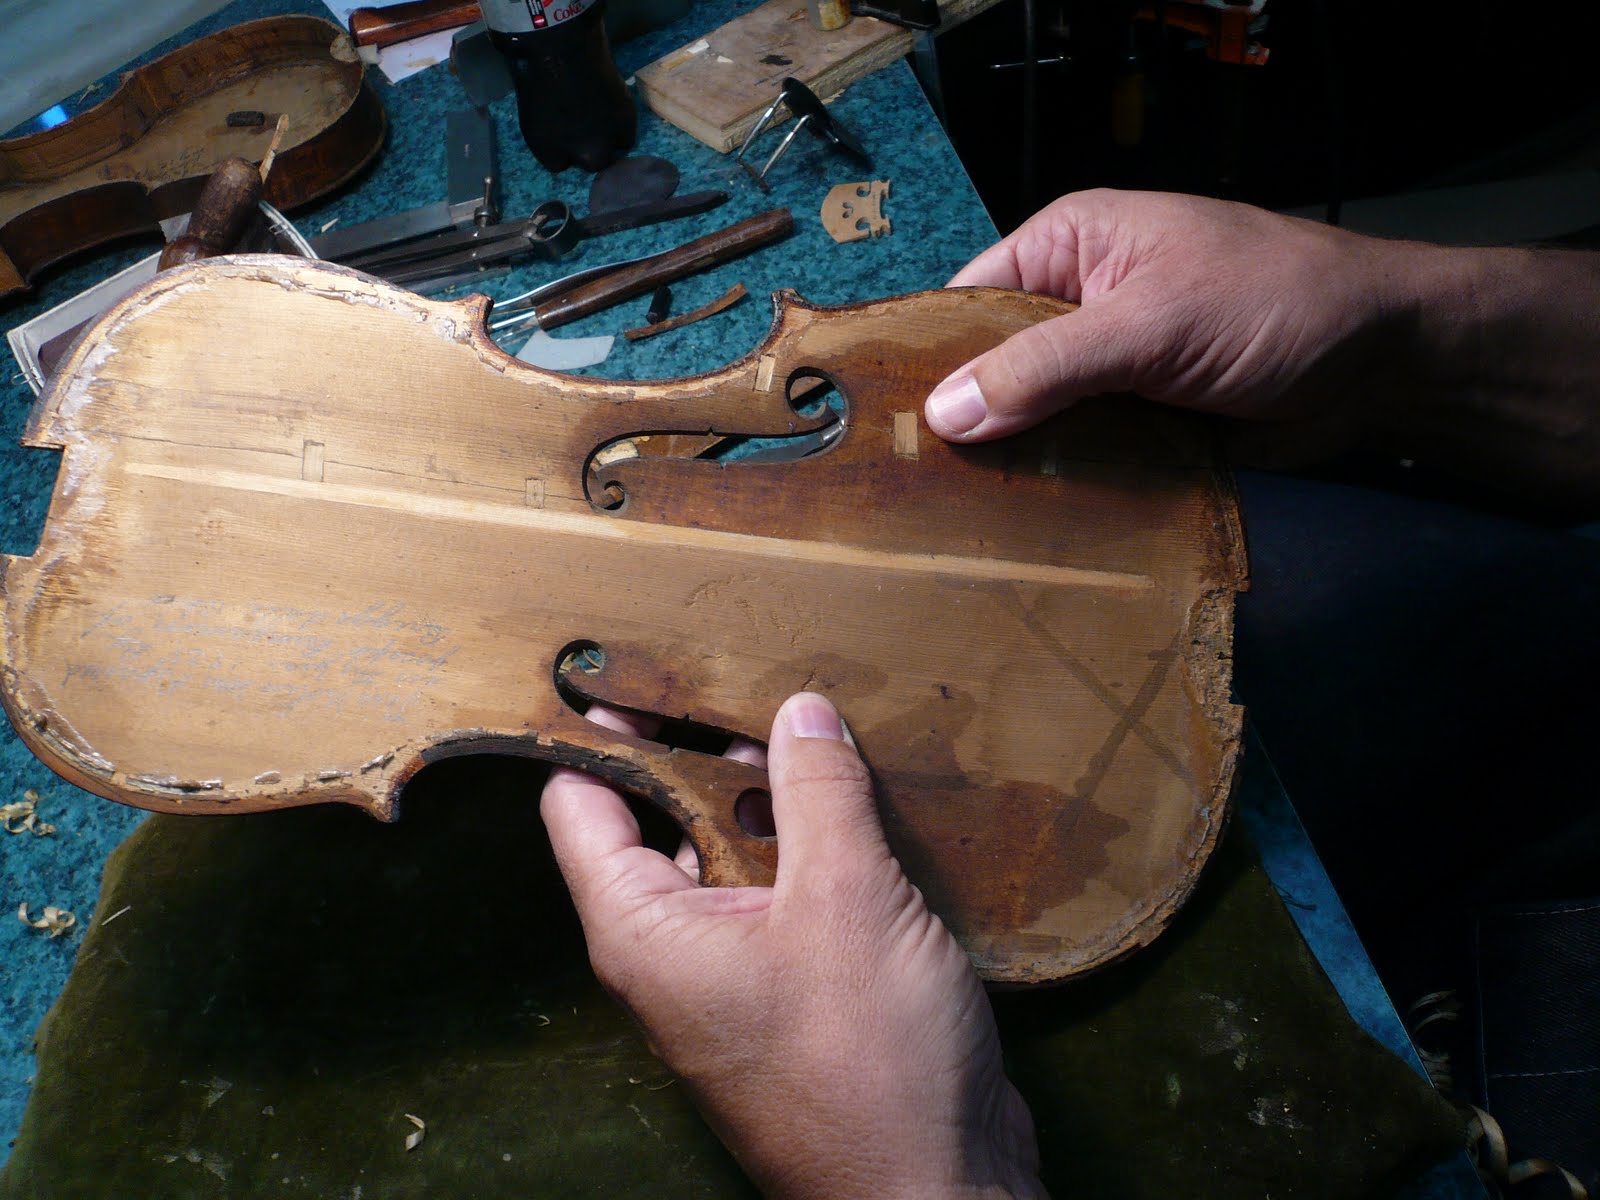
Below is the violin with top plate removed side-by-side with the inside of the back exposed. 


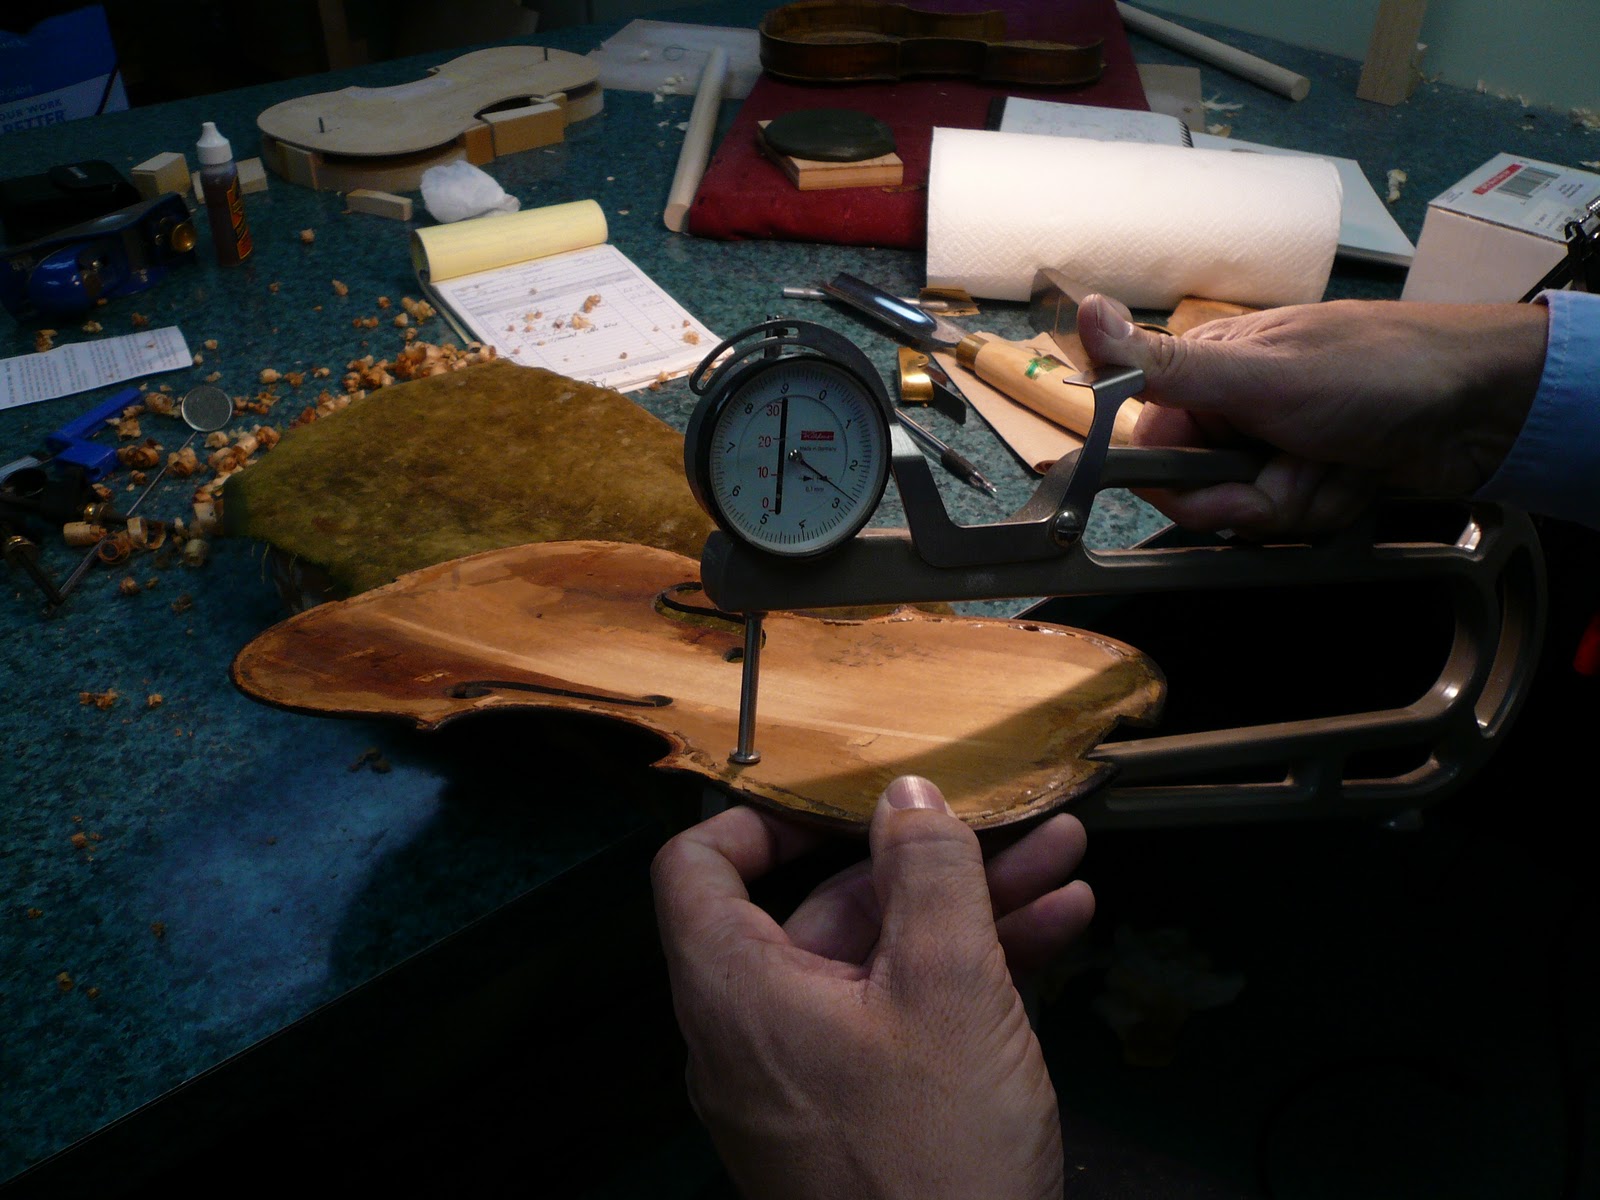
I asked Ben to take some measurements of the plates for future reference.
The back plate: 
length - 350.5 mm
lower bout width - 200 mm
upper bout width - 159.5 mm
width between C-bouts - 112 mm
maximum thickness center - 5.2 mm
minimum thickness upper corners - 2.5 mm

The top plate:
maximum thickness center between upper eyes of the F-holes - 5.1 mm
minimum thickness at the upper corners - 2.7 mm

Below repairs to the top plate are evident and may have been done by a skilled luthier who penciled in on the top, Repaired 1929 By Joseph Benjamin of Brigsdale, Ohio ( a suburb of Columbus).


Below Ben is splitting the corner blocks as he intends to eventually remove the ribs from the back plate completely.


Below Ben is soaking the label and the neck joint with water to soften and remove them.


Above and below Ben is splitting the neck joint to remove the neck easily.  

The remaining part of the joint will be easier to remove later.


The Assessment Verdict.

Ben believes the the two plates and all but the replacement rib can be restored and used as the basis for a Baroque violin.  A new neck with scroll, baroque finger board, replacement upper bass rib and new bass bar will need to be carved by Ben.  The maple ribs will need to be re-bent to better match the curve of the top and bottom plates.  Cracks will have to be repaired or re-repaired.  In order to improve the sound Ben proposes to re-graduate the the two plates.  Measurement of the plate thickness verified that the plates were nearly twice as thick as those of the great Stradivari and Guarnari instruments of the same period.  He will reduce the thickness of the plates consistent with the Italian masters.  Finally, the instruments will require cleaning and application of replacement varnish to repair damage from the scraping done previously.  A Baroque bridge, new sound post, baroque style pegs and gut strings will complete the restoration.  Ben estimates the time involved will be approximately 60% of that required to build a new Baroque violin.