Monday, October 18, 2010

A Strad Inspired Violin - Log 10/12/2010

Tuesday, October 12th, 2010
Regraduating the Top Plate

The most significant alteration Ben will make to the violin parts before reassembling them with a new bass bar, neck and fingerboard is the regraduation of the plates.  While this violin does not appear to be modeled after a specific Baroque maker, Ben hopes it will replicate the sounds of the early Amati instruments.  The plates in this instrument do not have quite as high an arching as an Amati or Strad but Ben hopes to remove enough wood in the regraduation process to increase flexibility and still maintain their strength.  His goal on the top plate is to reduce the thickness and weight down to that more common in the Strads and Amatis.  Below is the inside of the top plate before any graduation has started.

Ben is setting up the drill press to act as a depth gauge when he drills pilot holes that will determine the depth to which he removes wood from the plate.  This will go in phases.

Here Ben starts by drilling holes down the center line of the plate.  The gauge on the drill press prevents him drilling the plate deeper than 3.5mm.
Below you can see the pattern of holes covering the plate.  Because parts of the plate were less than 3/5mm thick originally there are no holes or even impressions made by the tip of the drill bit.
The raw wood exposed in the center between the F holes is where Ben has already finger planed down to the bottom depth of the drilled pilot holes.

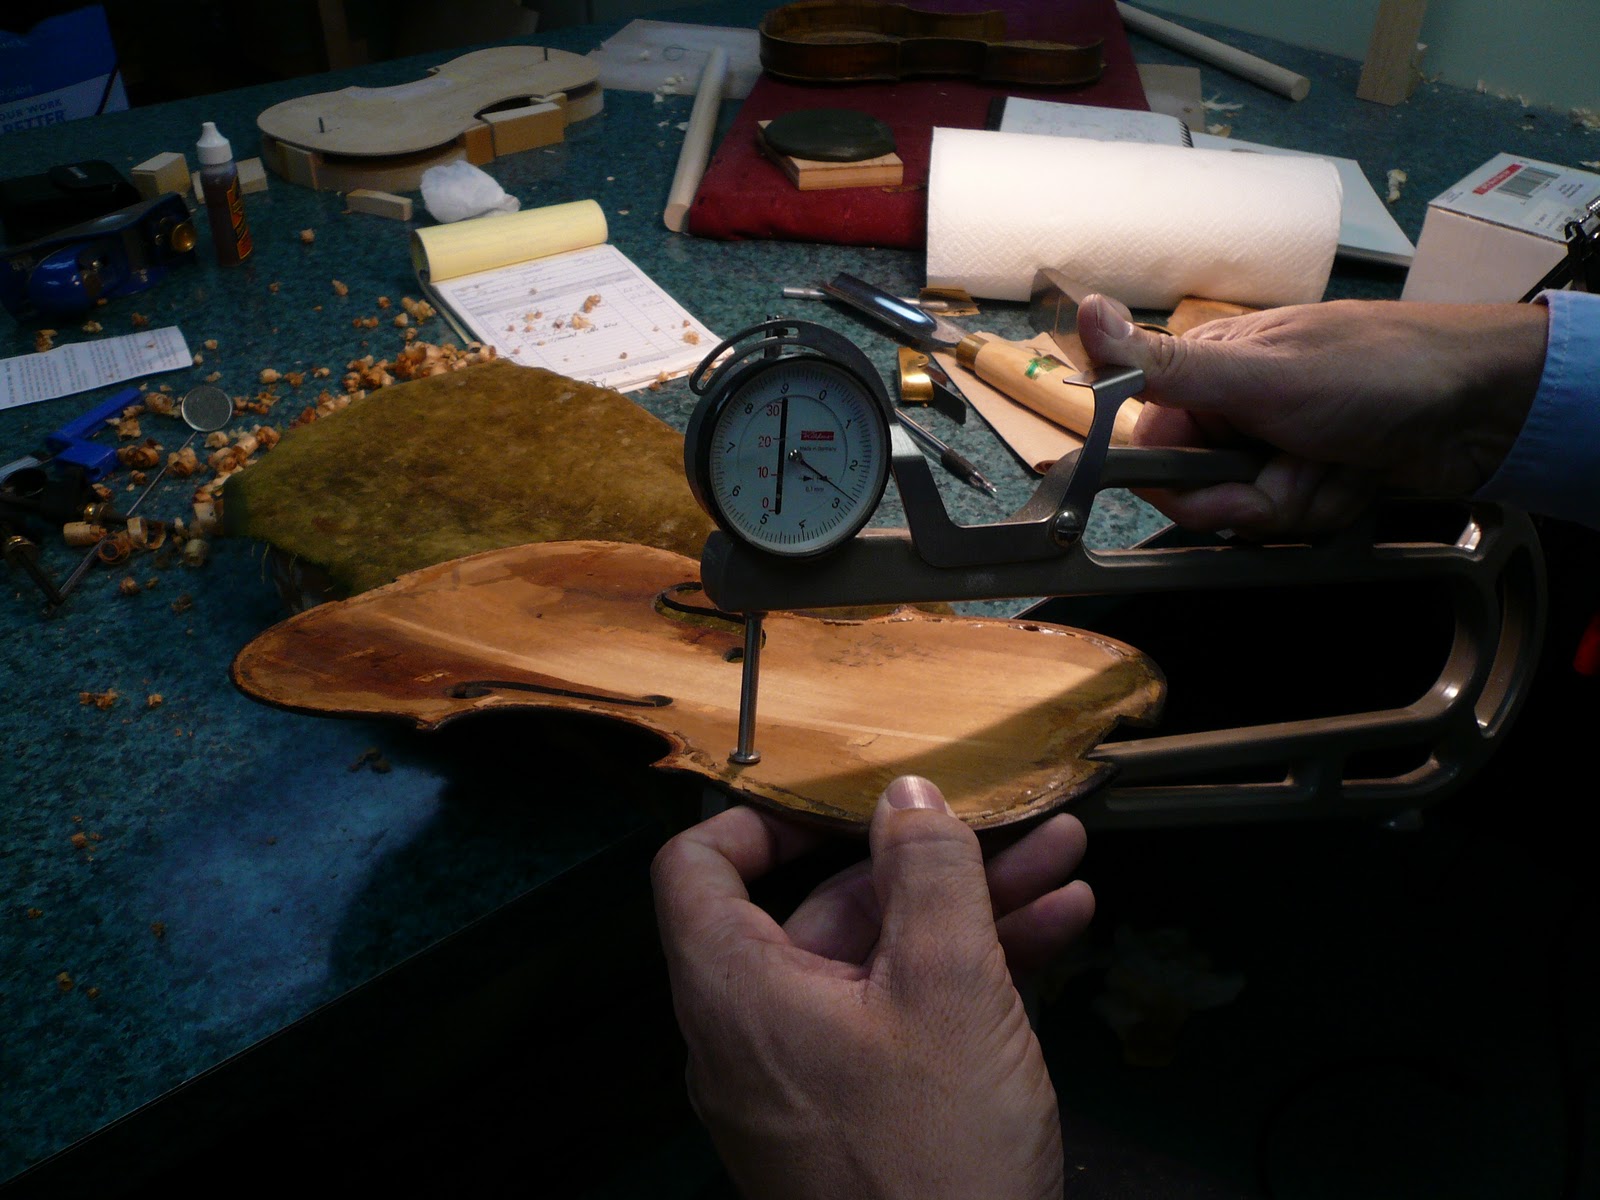
Here using a caliper thickness gauge you can clearly see he has hit his initial thickness of 3.5mm.

Below the gauge shows some of the original surface was already at 2.7mm.  This is the goal Ben has set for the overall thickness of the top plate.

Here before further drilling and planing Ben is removing hardened glue using a file.

Here he uses a scraper on the glue as he gets closer to the wood surface.

Below a new series of pilot holes have been drilled to a depth of 3mm.

Again, Ben finger planes the plate down this time to the new 3mm thickness.  Before doing this he checked the weight of the plate at the 3.5mm thickness and found it was 77 grams without the bass bar.  His goal is to reduce the weight to below 70 grams including the new bass bar which will probably weigh 5 grams alone.
More planing is shown in two photos below.

After completion of the second graduation pass, Ben reweighs the plate and it has dropped by 4 grams to 73 grams.  This means he may have to further graduate more areas down to as little as 2.7mm or he will not reach his 70 gram overall weight goal.  Throughout this process he tests the plate bending it slightly in his hands to test for the strength and flexibility he wants to achieve.  This is a highly subjective process, his personal judgement of the feel of the wood that has been learned through years of experience testing and hearing the end results after the instrument is completed.
Below Ben is evening out this work using a scraper which will not impact the weight significantly.
Here checking with the calipers again after the second graduation he verifies that he is at 3mm thickness.

A Strad Inspired Violin - Log 9/27/2010

Monday, September 27th, 2010
Making an Impression of the Back and Button Nub

In preparation for replacing the button on the back plate which will attach to the new neck Been needs to make an impression of the remaining button nub and the area surrounding it on the back plate.

On the left below you can see the green dental compound that will be used for the impression.

To protect the plate and make it easier to remove the dental compound Ben usually oils the surface and or place a piece of plastic wrap between the wood and the compound.

The dental compound has to be heated and worked in your hands until it is soft enough to be be pressed over the surface of the wood.  Below the softened compound is shiny as it is pressed against the outside of the back plate with a block of scrap wood.  You can clearly see the button nub against the green compound.


Below the impression is shown after it has hardened and been removed from the violin.

A Strad Inspired Violin - Log 9/16/2010

Thursday, September 16th, 2010

Removal of Remaining Neck and Ribs

Ben saws off as much of the remaining neck as possible.

 The part too close to the back to be safely to sawed must next be removed.


Ben finger planes the rest down to the back plate.
Below after finger planing Ben will need to remove built up glue.

He applies hot water below.  There is a sweet but nauseating odor given off as the glue liquifies.
.
Then he can scrap the softened glue down to the button which will eventually need to be replaced inserting a keystone linked new button just outside of the perfling.
Below Ben is examining the remaining ribs that will need to be removed again using hot water to soften the glue.

Here Ben is working with the C bout corner blocks some of which can be saved while others will need to be replaced.
He needs to separate the C bout blocks and rib lining so that he can remove the bottom bout.
Below is the back plate after the bottom bout ribs have been removed.

Because the bottom bout ribs were formed from a single piece of maple Ben was careful to remove them in one piece. 

Next he needs to clean them up by removing the cracked end block that will need to be replaced.
Below he is using a chisel to cut the block back to the rib.  Interestingly when he examined the bottom bout block and saddle he found additional indicators that this was probably a Mittenwald, German made violin.  The varnish appears to be soft, there is a notch in the rib for centering and inserting the saddle and there was a rosewood or ebony alignment pin that had been nailed through the top plate into the block.